
How to Disable Cortana in Windows 10 using Registry
In this tutorial, we are going to see how to disable Cortana in Windows 10 using registry. Windows 10 includes a number of interesting apps, but they can sometimes be quite annoying, especially if they don’t go through simple means. Cortana, a digital voice assistant pre-installed on Windows 10, is one of those Windows apps.
One of the main reasons to disable Cortana is that it consumes a lot of RAM, which leads to poor system performance.
How to Disable Cortana in Windows 10 using Registry
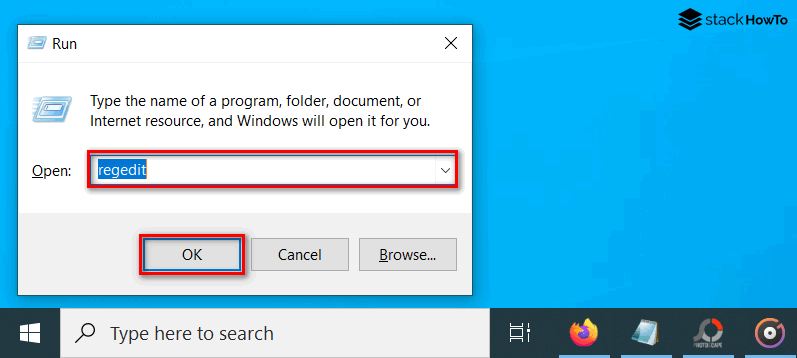
Step 1: Open the registry editor. Press Start + R, then type regedit in the prompt, then press Enter. Click Yes if you get a warning from the User Account Control.
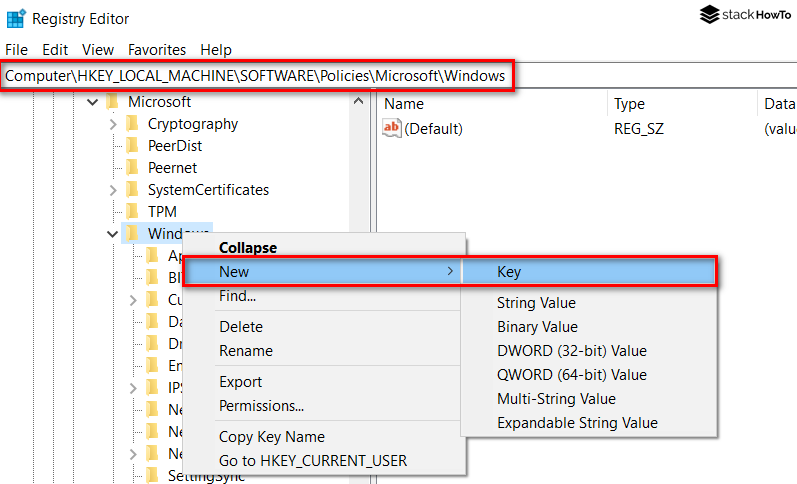
Step 2: Go to HKEY_LOCAL_MACHINE\SOFTWARE\Policies\Microsoft\Windows Search. If “Windows Search” does not exist, we had to create it.
Right-click on Windows folder and choose New > Key. Call it Windows Search.
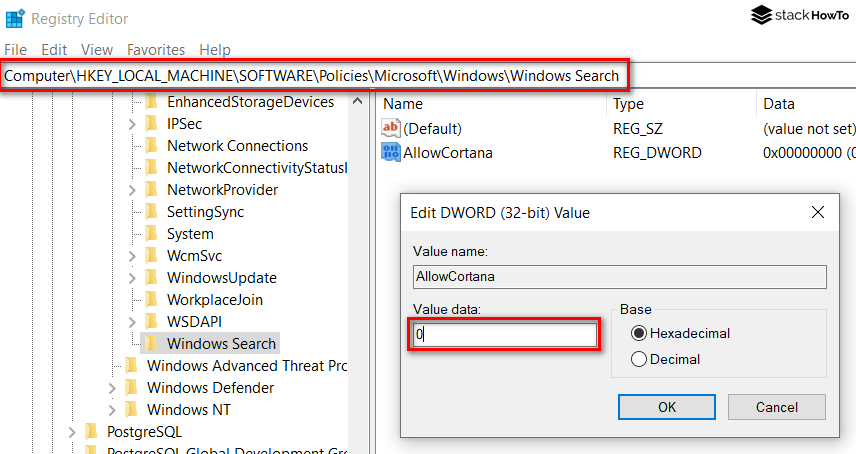
Step 3: Right-click on Windows Search and choose New > 32-bit DWORD Value.

Step 4: Name the DWORD AllowCortana. Click on it and make sure the value is “0”.
Step 5: Restart the computer (or log out and log back in). Cortana will be replaced by a regular search bar.
It’s possible that the next Windows update will restore Cortana to its proper place in Windows 10, so be sure to keep these instructions handy, just in case.
- Types of Ethernet Cable
- How to Install CAB File in Windows 10 using Command Line
- How to Change Multiple File Extensions at Once in Windows 10 Using PowerShell
- How to Make Taskbar Buttons Smaller in Windows 10
- How to Run AutoHotKey Script on Startup Windows 10
- How to Remap Keyboard Keys in Windows 10
- How to Search Files by Size in File Explorer on Windows 10/11
- How to Check Internet Data Usage in Windows 10
- How to Change Folder Background Color in Windows 10
- How to Turn off Location on Laptop Windows 10
- How to Disable Sleep Option from Windows 10 Start Menu
- How to Wake Up Computer From Sleep Mode in Windows 10 with Mouse
- How to Wake Up Computer From Sleep Mode in Windows 10 with Keyboard
- Batch File To Display Popup Message in Windows 10
- How to Display Popup Reminder in Windows 10
- How to See PC Startup and Shutdown History in Windows 10
- How to Record Your Screen with VLC on Windows 7/8/10
- How to Change Paging File Size in Windows 10
- How to Display Full Path in Title Bar of File Explorer on Windows 10
- How to Cancel Shutdown on Windows 10
- How to Schedule Auto Shutdown in Windows 10
- How to Schedule a Scan in Windows Defender
- How to Calculate Total Duration of Multiple Video Clips in Windows 10
- How to Fix Drag and Drop Problems in Windows 10
- How to Disable Power Throttling in Windows 10
- How to Run Program as Administrator Without Password Prompt in windows 10
- How to Limit Windows Defender CPU Usage
- How to Check if Windows 10 is Activated
- How to Fix Right Click on Desktop Not Working in Windows 10
- Image Resizer on Right-click for Windows 10
- How to Change Computer Name in Windows 10
- How to Change Account Picture in Windows 10
- How to Zoom in and out in CMD and PowerShell
- How to Lock Screen After Inactivity on Windows 10
- How to Sync Computer Time With Internet in Windows 10
- Command To Check Open Ports in Windows
- How to Keep a Window Always On Top on Windows 10
- How to Increase Font Size in Windows 10
- How to Change Cursor Color in Windows 10
- How to Change Cursor Size in Windows 10
- How to Change Default PDF viewer on Windows 10
- How to Disable Security Questions in Windows 10
- How to Pin Specific Settings to the Start Menu in Windows 10
- How to Format USB Device When FAT32 Option is Not Available
- How to Automatically Open a Web Page at a Specific Time
- How to Restart explorer.exe in Windows 10 Using CMD
- How to Restart Explorer.exe in Windows 10 [2 Methods]
- How to Add Program Shortcut to Start Menu in Windows 10
- Hibernate Option Not Showing In Windows 10
- How To Delete Previous Version of Windows in Windows 10
- How to Add Print Option in Right-Click Menu
- How to Delay Startup Programs in Windows 10/8/7
- How to Disable Task Manager on Windows 10
- How to Turn on Network Discovery in Windows 10
- How to Check if Virtualization is Enabled in Windows 10
- How to Password Protect a Zip File on Windows 10
- How To Change User Folder Name in Windows 10
- How to Restore Drivers in Windows 10
- How to Backup Drivers using PowerShell Command in Windows 10
- How to Add Store Apps to Startup in Windows 10
- How to Enable Fingerprint in Windows 10
- How to Enable Autocorrect and Predictive Text in Windows 10
- How To Open a Second File Explorer Window in Windows 10
- How to Block Websites On Your Computer
- Check Disk Command in Windows 10
- How to Activate a Window by Hovering Over it with the Mouse in Windows 10
- How to Control Volume for Individual Programs in Windows 10
- How to Schedule Restart in Windows 10
- How to Change Microsoft Store Region in Windows 10
- How to Hide the Clock From Windows 10 Taskbar
- How to Enable Number Pad on Keyboard Windows 10
- How to Turn Off Taskbar Thumbnail Previews in Windows 10
- How Can I See All Drives in CMD
- How to Show All Drives in Windows 10 File Explorer
- Windows 10 Privacy Settings to Turn Off
- How to Change Desktop Icons in Windows 10
- How to Force a Program to Open in Full Screen in Windows 10/11
- How to Delete Temporary Files in Windows 10
- How to Enable Startup Sound in Windows 10
- How to Reset All Default Apps in Windows 10
- How to Change Default Action on Connecting a USB Device Windows 10
- How to Remove Old Drivers From Windows 10
- Where is the Drivers Folder in Windows 10
- How to Reset Windows Update in Windows 10
- How to Format USB Using CMD on Windows 10
- How To Check WiFi Signal Strength on Windows 10 Using CMD
- How to Remove “Show Desktop” Button on Windows 10
- How to Enable Remote Desktop on Windows 10
- How To Open File Explorer To “This PC”
- How to Stop the Screen From Turning Off on Windows 10
- How to Change Default Folder Name in Windows 10
- How to Display Day of Week in Windows 10 Taskbar
- How To Display Windows 10 Start Menu in Full Screen
- How to Create a New Library in Windows 10
- How to Reset the Settings App in Windows 10
- How To Disable Startup Programs in Windows 10
- How to Enable Registry Backup in Windows 10
- How to Remove Password at Windows 10 Startup
- How to Reset Windows 10 To Factory Settings
- How To Enable or Disable Night Light in Windows 10
- How to Add Clocks to Start Menu on Windows 10
- How to Disable Bing Web Search Results in Windows 10 Start Menu
- How to check Bluetooth battery level on Windows 10
- How To Set Static IP Address in Windows 10/11 using CMD
- How To Find Out If a Program is 32 or 64-bit Windows 10
- How To Check Bios Firmware Version in Windows 10
- How To Activate Windows 10
- How to enter UEFI (BIOS) on Windows 10
- How to Boot From a USB Drive on Windows 10
- How to Reinstall Microsoft Store in Windows 10
- How to Enable Ultimate Performance Mode in Windows 10
- How to Stop Apps From Running in the Background on Windows 10
- How to Change Another User’s Password in Windows 10
- How to Delete Local User Account using PowerShell in Windows 10
- How to Create Local User Account using PowerShell in Windows 10
- How to Disable User Account Control (UAC) in Windows 10
- How to Block Inappropriate Websites on Windows 10
- How to Set Up a Child Account in Windows 10?
- How to Download Windows 10 ISO file (32 bits and 64 bits)
- How to Change the Default Save Location in Windows 10
- How to Add Open Command Prompt Here to right-click Menu in Windows 10
- Add Open PowerShell Window Here as Administrator in Windows 10
- How to Mount ISO Images on Windows 10
- How to Clear DNS Cache on Windows 10
- How to Change DNS Server in Windows 10
- How to Change Temp Folder Location in Windows 10
- How to Reduce the Size of the Search Bar in Windows 10
- How to Force Close a Program on Windows Without Task Manager
- How to Force Close a Program with Task Manager
- How to Speed Up Windows 10 Startup
- How to Enable Sandbox in Windows 10
- How to Disable Automatic Installation of Suggested Apps in Windows 10
- No Sounds on Windows 10? Here’s How to Fix It
- No Audio Output Device Is Installed in Windows 10 Fix
- Where is the Location of Startup Folder in Windows 10?
- How to Create a Windows 10 Bootable USB
- How To Run Computer Performance Test in Windows 10
- How To Tell If Your Computer Is 32 Or 64-bit Windows 10
- How to Remove Recycle Bin From Desktop on Windows 10
- How to Show My Computer, Recycle Bin Icon on Windows 10
- How To Enable Screen Saver In Windows 10
- How to Enable or Disable Updates For Other Microsoft Products on Windows 10
- How to Disable Windows 10 Startup Delay
- How To Open Emoji Keyboard on Windows 10
- How to Turn On File and Printer Sharing in Windows 10
- How To Optimize Windows 10 For Gaming
- How to Add Shortcuts to the “Send to” Menu in Windows 10
- How to Change the Screen Refresh Rate of Your Monitor in Windows 10
- How to Make a Program Run on Startup in Windows 10
- How to Turn Off SmartScreen in Windows 10
- How to Disable Telemetry in Windows 10
- How to Disable Windows 10 Tracking
- How to Disable Windows 10 Data Collection
- How to Free Up Disk Space in Windows 10
- Fast Way to Delete a Large Folder in Windows 10
- How to Create a Printer Shortcut on Desktop Windows 10
- How to Change Audio Output Device Per Application on Windows 10
- How to Format a Hard Drive or SSD in Windows 10
- How to Switch Between Windows in Windows 10 using Keyboard
- How to Download and Install Windows Media Player for Windows 10
- How to Create a Shortcut on Desktop Windows 10
- How to Block reopening of Programs on startup Windows 10
- How To Limit Windows Update Bandwidth in Windows 10
- How to remove the 3D Objects folder from This PC in Windows 10
- How to Remove Old User Account Pictures in Windows 10
- How to Delete the Hibernation File hiberfil.sys
- How to Show Seconds in System Clock in Windows 10
- How to Open Files and Folders with Single Click in Windows 10
- How to Reset Your Microsoft Account Password for Windows 10
- How to Fix Corrupted Files in Windows 10
- How To Export And Import Start Menu Layout In Windows 10
- How to Stop Automatic Restart After Updating Windows 10
- How to Remove Ads From the Start Menu in Windows 10
- How to Create a Homegroup Network in Windows 10
- How to Disable ads in File Explorer in Windows 10
- How To Fix gpedit.msc Group Policy Editor Missing in Windows 10
- How to Change the Network Connection Priority in Windows 10
- How to Watch Videos While Working on Other Tasks on Windows 10 Computer
- How to Create a System Repair Disk in Windows 10
- How to Customize the Taskbar in Windows 10
- How to Change Taskbar Icons in Windows 10
- How to Show the Control Panel in File Explorer on Windows 10
- How to Uninstall Updates in Windows 10
- How to reset all Local Group Policy on Windows 10
- How To Turn Windows 10 Computer Into a Wi-Fi Hotspot
- How to Reset Network Settings in Windows 10/11 Using CMD
- How to Disable the Game Bar in Windows 10
- How to Clear Windows 10 Update Cache
- How to Create an Invisible Folder without Any Name in Windows 10
- How to Add Open With to Right-click Menu in Windows 10
- How to Change Default Apps on Windows 10
- How to Prevent Copying Files From USB to PC
- How to Find Your WiFi Password on Windows 10
- How to Hide Your Name and Email Address on Windows Login
- How to Speed Up File Transfer in Windows 10
- How to Remove Power or Shutdown Button from Lock Screen in Windows 10
- How to Start Windows 10 in Safe Mode
- How to Stop Lock Screen ads in Windows 10
- How to Enable Guest Account in Windows 10 using CMD
- How to Restore Windows 10 Image Backup From Hard Drive
- How to Create a System Image in Windows 10
- How to Disable Automatic Update on Windows 10
- How to Stop Programs From Automatically Updating in Windows 10
- How to Take a Screenshot on Windows 10
- Windows 10: Start Menu And Taskbar Not Working
- How to Rebuild a Broken Icon Cache in Windows 10
- How to Turn Off Windows Security Notifications in Windows 10
- How to Preview a File Without Opening it in Windows 10
- How to Permanently Disable Windows Defender on Windows 10
- How to Disable the Action Center in Windows 10
- How To Reinstall Microsoft Edge In Windows 10
- How to Uninstall Microsoft Edge in Windows 10
- How to Change Start Menu and Taskbar Color in Windows 10
- How to Get Windows 7 Start Menu on Windows 10 with Classic Shell
- Why the Start Menu is Slow to Open in Windows 10
- How to Change Login Screen Background on Windows 10
- How to Restore Windows Photo Viewer in Windows 10
- How to Fix Screen Flickering in Windows 10
- How to Remove Windows 10’s Built-in Apps
- How to Fix Black Screen on Windows 10
- How to Remove Search Bar From Taskbar on Windows 10
- How to Disable Windows 10 Peer-to-Peer Updates
- How to Downgrade to Windows 7 From Windows 10
- How to Fix Windows 10 Start Menu And Cortana Not Working
- How to Backup and Restore Registry in Windows 10
- How to Change the Default Installation Location on Windows Using Regedit
- How to Force Restart Windows 10 with Keyboard
- How to Remove Shortcut Arrow from Desktop Icons on Windows 10
- How to Find Computer Specs on Windows 10
- How To Move Your Libraries To Another Drive in Windows 10
- How to Enable Numlock at Windows Startup
- How to Change CMD Color in Windows 10
- How To Increase Font Size In CMD
- How To Assign Letter To Drive In CMD
- How To Get MAC Address In CMD
- How to Open File Explorer Using CMD on Windows 10
- How To Run Batch File On Windows Startup
- How To Run EXE From A Batch File
- How To Run A Python Script From A Batch File
- How to Run PowerShell Script From A Batch File
- How to Run Multiple Batch Files From One Batch File
- Batch File To Copy All Files From One Folder To Another
- How To Compare Strings In Batch Files
- How To Concatenate Variables In Windows Batch File
- How To Clear A Variable In A Batch File
- For Loop Counting From 1 To N in a Batch File
- How to Run Batch File Automatically Every X Minutes
- Batch File To Get and Set System Date
- Batch File To Set Default Programs in Windows 10
- Batch File To Get Computer Name
- Batch File To Get Current Directory
- Batch File To Get Input From User
- Batch File To Get IP Address
- Batch File To Get MAC Address
- How to Add a Registry Key in a Batch File
- Batch File To Create Local User Accounts
- Batch File To Create a Text File
- Batch File To Create a Folder
- Batch File To Create Folders From a List
- Batch File To Write Ping Results To a Text File
- Batch File To Write Variable To a Text File
- Batch File To Write To a Text File
- Batch File To Read XML File
- Batch File To Read CSV / XLS
- Batch File To Read Text File Line By Line into A Variable
- Batch File To List Folder Names
- Batch File To List Folders and Subfolders
- Batch File To List Filenames in a Specified Folder
- Batch File to List All Files in a Folder and Subfolders
- How to Check Internet Connection using Batch File
- How to Check the Size of a File in a Windows Batch Script
- How To Check Batch File Error
- Batch File To Check If Folder Exists
- How to Check If a Path is File or Directory using Batch
- Batch File To Delete Folders Older Than N Days
- Batch File To Delete All Files in Folder Older Than N Days
- Batch File To Delete All Files In Folder
- Batch File To Delete A File If Exists
- Batch File To Check If Multiple Files Exist
- Batch File To Check If File Exists
- Batch File Commands List With Examples
- 8 Batch File Commands You Should Know
- How to Create a Batch File in Windows
- How to Run Batch File in CMD
- How to Run EXE File in CMD
- How to Change the MAC Address on Windows 10
- How to Create a Website Shortcut on Desktop In Windows 10
- 29 Run Commands in Windows You Should Know
- How to Ping IP Address in CMD
- How to Get IP Address Using Ipconfig in CMD
- How to Delete Folder Using CMD in Windows 10
- CMD Commands List You Should Know
- How to Change Lock Screen in Windows 10
- How to Show My Computer Icon on Desktop in Windows 10
- How to Change Compatibility Mode in Windows 10
- How to Uninstall Internet Explorer in Windows 10
- How to Add or Change Desktop Theme in Windows 10
- How to Disable Transparency Effects in Windows 10
- How to Delete and Uninstall Fonts in Windows 10
- How to Install New Fonts in Windows 10
- How to Disable Lock Screen on Windows 10 Using Registry
- How to Customize Action Center in Windows 10
- How to Disable Cortana in Windows 10 using Registry
- Battery Icon Missing From Taskbar in Windows 10 [Solved]
- How to Change Desktop Background in Windows 10
- How to Increase Battery Life of Windows 10 Laptop
- How to Turn off Notifications in Windows 10
- How to Create Keyboard Shortcuts in Windows 10
- How to Change Desktop Icon Size in Windows 10
- How to Turn On Dark Mode on Opera
- How to Turn On Dark Mode on Mozilla Firefox
- How to Turn On Dark Mode on Google Chrome
- How to Turn On Dark Mode on Microsoft Edge
- How to Enable Dark Mode in Windows 10
- How to Increase Mouse Sensitivity in Windows 10
- How to Find Which Programs are Slowing Down Your Boot Time in Windows 10
- How to Defrag the Hard Drive in Windows 10
- How to Copy and Paste Into Command Prompt in Windows 10
- How to Enable the On-Screen Keyboard in Windows 10
- How to Check Laptop Battery Health in Windows 10
- How to Use Offline Maps in Windows 10
- How to Calibrate Your Monitor in Windows 10
- How to Enable God Mode in Windows 10
- How to Increase Processor Speed in Windows 10
- How to Pin a Folder to Taskbar in Windows 10
- How to Pin a Website to Taskbar in Windows 10
- How to Switch Between Desktops in Windows 10
- How to Make Windows 10 Boot Faster
- How to Stop Windows 10 From Sleeping
- How to Set an Alarm Clock on Windows 10
- How to Go Directly to Desktop in Windows 10
- How to Create a New Folder on Windows 10
- How to Reduce Blue Light on Computer Screen on Windows 10
- How to Turn on Speech Recognition in Windows 10
- How to Sync My Settings in Windows 10
- How to Change the Screen Resolution on Windows 10
- How to Create a New User on Windows 10
- How to Turn Off Tablet Mode in Windows 10
- How to Uninstall a Program on Windows 10
- How To Change Password In Windows 10
- How to Take a Screenshot on Windows 10
- Top Keyboard Shortcuts in Windows 10
- How to Speed Up Windows 10 Shutdown
- How to Change Default Browser in Windows 10
- How to Disable the Lock Screen in Windows 10
- How to disable User Account Control in Windows 10
- How to Hide File Extensions in Windows 10
- How to Show Hidden Files and File Extensions in Windows 10
- How to Create a Restore Point with System Protection Enabled in Windows 10
- How to Delete Browsing History on Firefox in Windows 10
- How to Delete Browsing History on Microsoft Edge in Windows 10
- How to Delete Browsing History on Google Chrome in Windows 10

Excellent steps.Thank You
Like this thread!
Thank you very much for this information on Cortana.