Check Disk Command in Windows 10
In this tutorial, we are going to see how to use chkdsk command to check the disk in Windows 10. Whenever your system crashes or shuts down unexpectedly, Windows can run a disk recovery tool called Chkdsk or Check Disk. This tool looks for errors on the hard disk and tries to correct these errors while trying to recover as much data as possible. Not only that but the chkdsk utility can also recover items when your system is facing BSOD (blue screen of death), bad sectors in case of damaged or old hard disk, cluster problems, file system problems, etc.
As you can see, chkdsk is a very useful utility that makes your life easier. Usually, Windows automatically runs the chkdsk tool as needed. However, you can also run the chkdsk tool manually. If you want to do this, it is best to know all the important or significant chkdsk commands in Windows 10. To help you, We will list all the chkdsk commands and their usage.
List of Check Disk Command in Windows 10
Chkdsk has a wide range of switches and command line parameters to help you run the utility correctly and efficiently. Below are all the Check Disk commands and their definitions.
Volume: This parameter allows you to define a drive letter or volume name so that the chkdsk command can scan the target drive. For example, to scan drive D, you would use D:
Filename: This parameter is used to scan a certain file for any fragmentation. This parameter works only on FAT and FAT32 file systems. However, in the real world, you won’t use this parameter much.
/F: Use this switch to make chkdsk automatically correct any errors detected during scanning.
/R: This switch searches for bad sectors and, if possible, recovers all readable information from those sectors.
/L: size: This switch works only on the NTFS file system. The switch allows you to change the log file size related to NTFS transactions. In general, this is intended only for server administrators.
/X: Sometimes, if the volume is mounted, it can cause problems with scanning and recovery. In these situations, you can use this switch. When used, if necessary, it will force the target volume to be unmounted, which will cause the handles to be disabled. Unless you know what you are doing, do not use this switch.
/JE: This switch makes the index scan less vigorous. As you can see, you can use this switch when you are doing low-priority scans or when you are on a crisis period. Also, this switch only works on the NTFS file system.
/C: Like the switch above, this only works on the NTFS file system. When used, this switch will skip the cycle check with the folder structure.
/B: This switch allows the chkdsk tool to re-evaluate bad clusters on the volume.
How to Use Check Disk Command in Windows 10:
Using the chkdsk command is quite simple and straightforward. Generally, most people just want to search for drive errors on the whole hard disk or on a particular partition. To use chkdsk, you must open the command prompt as an administrator.
chkdsk [volume[[path]filename]]] [/F] [/V] [/R] [/X] [/I] [/C] [/L[:size]] [/B] [/scan]
If you want to scan your C drive, use the following command. Of course, if you want to scan another drive, simply replace C with the drive letter of your choice.
chkdsk C:
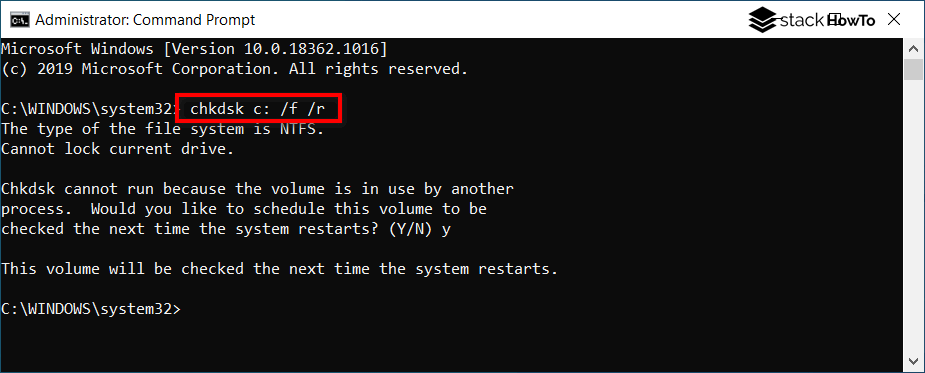
To check and repair a disk, you can use the following command.
chkdsk C: /f /r