Customize Consent Preferences

We use cookies to help you navigate efficiently and perform certain functions. You will find detailed information about all cookies under each consent category below.

The cookies that are categorized as "Necessary" are stored on your browser as they are essential for enabling the basic functionalities of the site. ... 

Always Active

Necessary cookies are required to enable the basic features of this site, such as providing secure log-in or adjusting your consent preferences. These cookies do not store any personally identifiable data.

No cookies to display.

Functional cookies help perform certain functionalities like sharing the content of the website on social media platforms, collecting feedback, and other third-party features.

No cookies to display.

Analytical cookies are used to understand how visitors interact with the website. These cookies help provide information on metrics such as the number of visitors, bounce rate, traffic source, etc.

No cookies to display.

Performance cookies are used to understand and analyze the key performance indexes of the website which helps in delivering a better user experience for the visitors.

No cookies to display.

Advertisement cookies are used to provide visitors with customized advertisements based on the pages you visited previously and to analyze the effectiveness of the ad campaigns.

No cookies to display.

MySQL

How to install MySQL Workbench on Ubuntu using Terminal

In this tutorial, we are going to see how to install MySQL Workbench on Ubuntu using Terminal. MySQL Workbench is a feature-rich graphical tool used for modeling data, creating SQL queries, managing MySQL servers, etc. This tutorial will show you how to install Workbench using the Ubuntu package manager.


[st_adsense]  

How to install MySQL Workbench on Ubuntu using Terminal

Installing MySQL Workbench on Ubuntu is a fairly straightforward process. Update the package index and install the MySQL Workbench package:

$ sudo apt update


$ sudo apt install mysql-workbench


Launch MySQL Workbench

Now that you have MySQL Workbench installed on your Ubuntu system, you can start it from the command line by typing mysql-workbench or clicking on MySQL Workbench icon (Activities – > MySQL Workbench ).


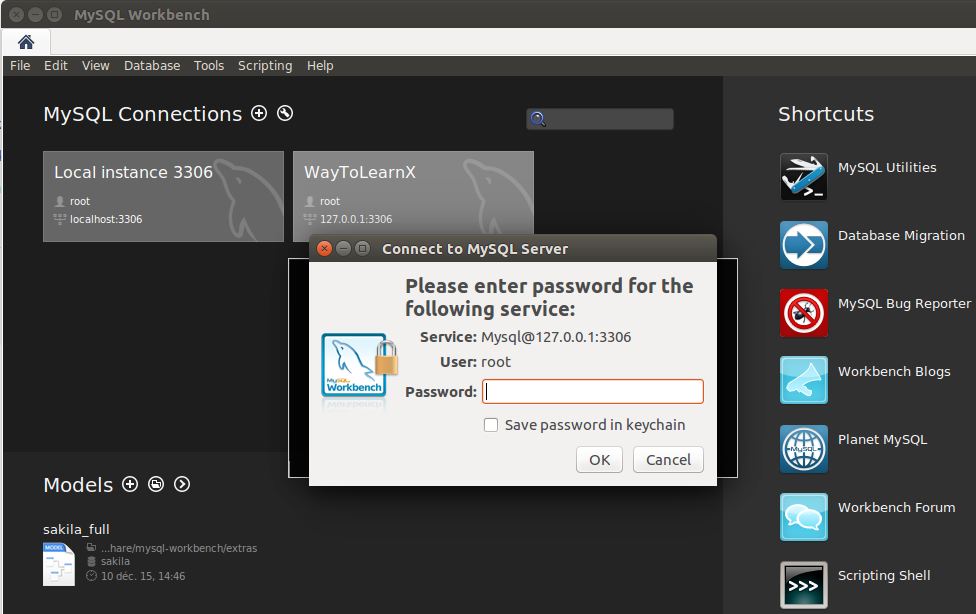
When you start MySQL Workbench for the first time, a window like this should appear:


[st_adsense]  

Using MySQL Workbench

To add a new connection, click on the circled plus sign in front of “MySQL connections”. A new window will open. Enter a meaningful name in “Connection Name” field. Leave the default value in “Hostname” field (127.0.0.1), “Port” (3306) and “Username” (root). Finally, click on “Test Connection” button.


Enter the Database Password.


Once connected, you can start managing your MySQL users and databases.


[st_adsense] mcq

Leave a Reply

Your email address will not be published. Required fields are marked *