How to install MySQL on CentOS 7
In this tutorial, we are going to see how to install MySQL on CentOS 7. MySQL is a popular DBMS for free and open-source database management. It is part of the LAMP stack (Linux, Apache, MySQL, PHP), a collection of software used for servers.
When CentOS 7 released, MySQL was removed from the standard repositories in favor of MariaDB. MariaDB is fully compatible with MySQL and can be replaced almost transparently.
To install MySQL on CentOS 7, follow these steps:
Step 1: Install MySQL
‘Yum’ command actually installs MariaDB. To install MySQL, we need to visit Yum repository of MySQL community, which provides packages for MySQL.
So, visit this website : https://dev.mysql.com/downloads/repo/yum/

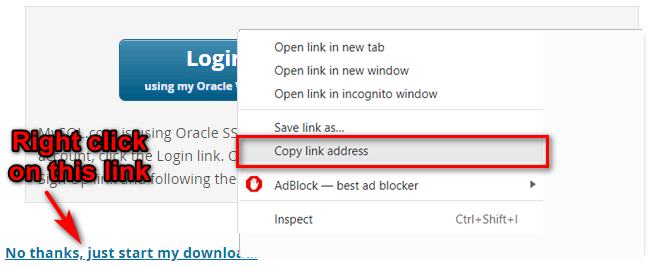
Note that the download links do not lead directly to the files. Instead, they lead to a next page where you are prompted to sign in or create an account. If you don’t want to create an account, you can locate the text “No thanks, just start my download. , Then right-click and copy the location of the link.
Or you can change the version number in the following commands.
$ wget https://dev.mysql.com/get/mysql80-community-release-el8-1.noarch.rpm
Once the rpm file is saved, we will check the integrity of the download by running md5sum and comparing it with the corresponding MD5 value on the website:
$ md5sum mysql80-community-release-el8-1.noarch.rpm
Output:
7166fed89332ab92fb3ec666e95d6ad1 mysql80-community-release-el8-1.noarch.rpm
Compare this output with the appropriate MD5 value on the website:

Now we have checked that the file has not been corrupted or modified, we will install the package:
$ sudo rpm -ivh mysql80-community-release-el8-1.noarch.rpm
The above command adds two new ‘yum’ repositories, and we can now use them to install the MySQL server:
$ sudo yum install mysql-server
Step 2: Start MySQL
We will start the daemon with the following command:
$ sudo service mysqld start
Step 3: Display the default password for the root user.
When you install MySQL, the root user account is given a temporary password. To see the password of the root user account, use the following command:
# grep "A temporary password" /var/log/mysqld.log
Output:
[Note] A temporary password is generated for root@localhost: afrygPlkj3+x145
Note: Your temporary password will be different. You will need this password to change the password for the root user account.
Step 4: Secure the MySQL server
Run mysql_secure_installation command to secure MySQL server:
# mysql_secure_installation
It will ask you for the current password of the root account:
Enter password for user root:
Enter the temporary password above and press Enter.
You will need to enter the new password for the root account twice. You will be asked some questions, it is recommended that you type yes (y).
Step 5: Restart and activate MySQL service
Use the following command to restart mysql service:
# service mysqld restart
Then run the following command to start mysql service automatically when the system starts:
# chkconfig mysqld on
Step 6: Connect to MySQL
Use this command to connect to MySQL server:
# mysql -u root -p
It will ask you for the password of the root user. You type the password and press Enter:
Enter password for user root:
When you have access use SHOW DATABASES command to display all databases on the current server:
mysql> show databases;
Output:
+--------------------+
| Database           |
+--------------------+
| information_schema |
| mysql              |
| performance_schema |
| sys                |
+--------------------+
4 rows in set (0.05 sec)